Excerpts from the Tai Chi Book
Standing Post Exercises
Zhan Zhuang ( ) )
Standing Post exercises are the architectural foundation for all Qigong and Tai Chi positions. They are powerful and deceptively simple. The ancient Chinese discovered that by standing and relaxing for an extended period of time with the body aligned in specific ways, they could open up the energy channels in the body and increase the circulation of qi.
In the beginning, one should start out doing 2-5 minutes of standing each morning and work up to 20-30 minutes. Start with the most basic posture (Wuji, see below) and add onto it.
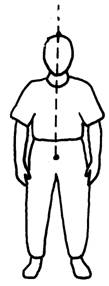
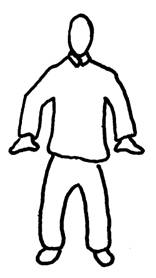
Basic Position:  (Wuji Stance) (Wuji Stance)
This is the basic Qigong position. “Wuji” means “without polarity.” It refers to the Chinese concept of the world before creation, before separation into yin and yang (left/right, night/day, up/down, empty/full). In Qigong and Tai Chi it means the root posture from which all others extend. It is a basic, centered standing position without any shifting of weight left or right, forward or backward, up or down. |
|
The following components of the Wuji stance apply to most of the Zhan Zhuang postures:
- Feet: Stand with your feet shoulder width apart, keeping the entire foot evenly spread out over the floor with nine points in contact with the ground (heel, outside of foot, 2 balls of the foot and 5 toes). Equalize the weight-bearing on three points: 1) the ball of the big toes; 2) the ball of the last two toes; 3) the middle of the heel. Be sure that you are not shifted toward the toes nor the heel, neither toward the inside nor outside. Toes are pointed forward, as close to parallel as is comfortable.
- Arms: Drop the shoulders and elbows. Allow the arms to hang loosely by the sides.
- Fingers: Relax the fingers and allow them to curve gently and remain slightly separated. Feel gravity pull the fingers down toward the ground, extending the arm, until you the pull feel in your spine.
- Head: Imagine your whole body as if it were being pulled up from a string attached to the crown of the head. The string should be directly in line with the tips of the ears. Feel yourself sinking down, relaxing as you hang from the string like a puppet.
- Nose and mouth: Breathe calmly and naturally, using abdominal breathing. Inhale and exhale gently though your nose only. Your mouth should be closed, but the jaw should be relaxed with a slight gap between the teeth. If saliva forms, swallow it.
- Eyes: Look forward. Allow your gaze to soften and become aware of your peripheral vision. Do not focus on any particular object. Allow your consciousness to globally diffuse over the field of your body and environment, but without becoming foggy. Stay alert but relaxed.
- Chin: Tuck in the chin slightly so that your head is not craning forward. Feel the back of the neck at the base of the skull open. As the curve of the neck flattens slightly, feel the crown of the head push slightly higher.
- Chest: When you begin the stance, take a deep breath, fill the chest, then exhale completely and quietly through your mouth and allow your chest to sink down toward the belly, but without slumping the spine: maintain this relaxed position of the chest while you breathe normally from the abdomen.
- Knees: Soften the knees, allowing them to bend very slightly, just enough to feel a springy, soft quality in them. Gently push the knees apart, as if there were a balloon between the thighs inflating slightly. Be careful not to shift your weight to the outside of the feet. Keep the balls of the big toes firmly planted. Feel how the slight separation of the knees helps link the legs together as a unit. It also opens the hips in the front and causes the pelvis to slightly tuck under in the back. You can confirm this sensation of stability by briefly doing the opposite -- make yourself knock-kneed and stick out the butt. then gently pusht he knees apart and allow the butt the tuck under slightly. Notice how much more rooted that position feels. The legs should feel as if they were screwing down into the ground, like two giant screws.
- Lower back/hips/pelvis: Relax the lower back without sticking out the belly or the buttocks. Allow the lower back to flatten slightly (tucking the pelvis under), but without sticking the belly out. Feel the tucking of the pelvis subtly elongating the spine. Do not bend forward. Imagine you are simply resting your pelvis on the edge of a high stool. Alternately, imagine as if you had a large dinosaur tail. Feel it settling onto the ground, pulling the lower spine downward.
- Spine: Feel the tailbone sinking down, pulling the lower spine down toward the ground. At the same time, feel the crown of the head being pulled up, pulling the spine up toward the sky. Feel the entire spine elongating and opening in both directions simultaneously. You may also imagine the spine extending through the tailbone deep into the earth, and continuing through the crown of the head high into the sky.
- Mind: See Eyes.
- Duration: Stand quietly, allowing your whole system to calm down. In the beginning, you should start with 2-5 minutes and gradually build up.
Adjusting your position:
- Suspended like a puppet: Feel your whole frame suspended from the crown of the head, as if your shoulders were a coat hanger and the body hanging down like a garment.
- Line of suspension: The line from which you are suspended passes through the midpoint between the tips of the ears, and through the Dan Tian, a point roughly 3 inches below your navel and one-third inside your body.
- Rooting: From below your kneecaps, imagine yourself extending roots downward like a tree. Feel as if the feet were dissolving and seeping into the earth, like popsicles in warm water.
Whole Body Breathing
Whole Body Breathing (Quan Shen Hu Xi) is an excellent exercise for feeling qi and connecting the movements of the whole body, centered on the breath.
Whole Body Breathing, Exercise One: Raising the Arms Slightly
- Stand in the basic Wuji stance (see above). Allow the whole system to settle down for a minute. Breathe into the lower abdomen. Allow your gaze to soften and become aware of your peripheral vision. Allow your attention to diffuse and spread over the entire body, not focusing too much on any one particular part. Keep every part of the body simultaneously within the field of your peripheral awareness.
- Feel the arms hanging heavy from the shoulders, like two leaden chains. Feel gravity pulling the fingers down toward the ground. Allow the hands and arm to grow heavier until you can feel the pull all the way up the arm to the neck.
- Slowly and heavily raise the arms a few inches from the body. Hold for a moment. Feel the arms heavy and relaxed. Allow the shoulders to sink down a bit more. Feel the fingers draping toward the floor.
- Slowly lower the arms back down to the sides.
- As you inhale, again raise the arms a few inches from the body. Exhale, and sink the arms back to the side. Feel the whole body expanding slightly with each in-breath and sinking down with the out-breath. Repeat 4x.
- Now, allow the movements to become even smaller, so that someone standing nearby might not even notice the subtle movement of your arms as you inhale and exhale. Allow the arms to naturally and ever so slightly expand as you inhale and sink down as you exhale, almost with no effort on your part. Feel the whole body soft and inflating like a balloon as you inhale, and shrinking down as you exhale.
- Feel yourself not so much breathing as being breathed.
- Sink the arms back down to sides. Rest for a moment and notice how the body feels.
Whole Body Breathing, Exercise Two: Holding the balloon
- Stand in the basic Wuji stance (see above).
- Begin by practicing the preceding exercise (Whole Body Breathing, Exercise One) several times until the arms feel heavy, relaxed and energized.
- Raise the hands in front of the abdomen with the palms facing, as if holding a balloon. Allow the hands and fingers to soften and mold to curved surface of the balloon, using just enough pressure to prevent the balloon form slipping away. Feel the arms heavy and relaxed, the shoulders and elbows sinking down.
- As you inhale, feel the balloon expanding, pushing the hands apart. At the same time, straighten the knees to rise up.
- Exhale and allow the whole body to shrink back down into the starting position. Continue for several breath cycles. Imagine yourself playing a qi accordion. Feel the whole body expanding as you inhale, and sinking down as you exhale.
- Now, allow the movements to become even smaller. Allow the body to naturally and ever so slightly expand as you inhale and sink down as you exhale, almost with no effort on your part. Feel the whole body soft and inflating like a balloon as you inhale, and shrinking down as you exhale.
- Feel yourself not so much breathing as being breathed.
- Now cease all movement. Imagine yourself continuing to do the exercise, but without actually performing the movements.
- Sink the arms back down to sides. Rest for a moment and notice how the body feels.
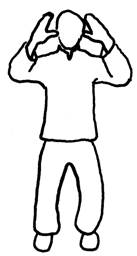
Whole Body Breathing, Exercise Three: Raising the hands overhead
- This is another variation on the Whole Body Breathing. It can be used as a substitute for the preceding exercise (Exercise Two)
- Stand in the basic Wuji stance (see above).
- Begin by practicing Exercise One (see above) several times until the arms feel heavy, relaxed and energized.
- As you inhale raise your arms in front and continue to raise them until the palms facing forward overhead. Keep the arms relaxed and try not to stretch.
- Exhale and lower your arms from the shoulders down to the sides.
- Breathe with the whole body. As you inhale, draw the energy from the feet all the way up to the fingertips. Feel the whole body inflating with breath. Then exhale and allow the whole body to relax and sink down.
- Do 3x, then do 3x in the other direction (inhale as you raise the arms to the sides and exhale as you lower them in front).
- Sink the arms back down to sides. Rest for a moment and notice how the body feels.
Advanced Standing Post Exercises
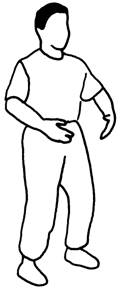
Standing Post, Second Position: Abdomen Level
- Preliminary: First stand in Wuji position for a minute and allow your whole system to settle down.
- Arms heavy: Slowly raise the arms a few inches away from the body. Hold for a moment. Feel the arms very heavy and relaxed. Allow the shoulders to sink down a bit more. Feel gravity pulling on the tips of the fingers, which drape down toward the floor with a natural, relaxed curve. Feel the pull of gravity extend from the fingers all the way up into the spine.
- Embracing a big belly: Slowly round the arms around to the front, hands at belly level, palms facing the abdomen. The fingers should be relaxed and draping down, as if resting on a great big belly. The fingertips point toward the opposite knee. The arms are held slightly away from the body, creating a space roughly the size of a fist under the armpits.
- Arms suspended by a strap: Imagine the arms as if suspended by an invisible strap wrapped behind the neck. Completely relax the arms and allow the strap to hold them up.
|
|
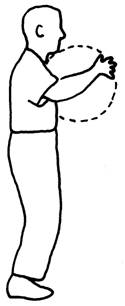
Standing Post, Third Position: Chest Level
- Embrace a ball: Slowly raise and wrap the arms around as if embracing a sphere in front of the chest. The palms are facing the neck or shoulders. The elbows are hanging down, as if suspended between the shoulders and the wrists, slightly lower than both.
- Balloons: Imagine that you are holding a large beach ball between your hands, forearm and chest. You are gently keeping it in place without tension. Your elbows are resting on two large balloons that float on the surface of a pond. Your upper arms rest on two small balloons in the armpits. Your thighs and knees gently embrace another balloon. Your bottom is resting on the edge of a huge balloon
- Rooting and rising: From the navel downward, feel yourself sinking and rooting into the ground. From the navel upward, feel an upward pull through the crown of the head making you taller, growing upward like a tree.
|
|
Adjust your position:
- Practice using a wall to align yourself. When you feel you can hold the position, step away from the wall and apply the same principles.
- Distance from the wall: close enough so that spine can flatten against wall without feeling like you are leaning back. Should be able to remove the wall suddenly and not have to adjust yourself.
- Shoulders: Move shoulder blades firmly back to the wall so that the whole area of each shoulder blade is in firm contact with the wall. Now round the shoulders forward, feeling the shoulder blades move away from the wall, until just the spine and, if possible, the area between the medial borders of the scapulae remain on the wall
- Knees: imagine that you are straightening the joint without actually straightening it
- Compression: Imagine someone pushing very lightly on the top of you head. Maintain a very relaxed ground connection from foot to top of the head and straighten up into the imaginary pusher’s hand. Thus move with the whole body and not think of straightening the legs or moving from the center
- Rising against pressure: Slightly flex knees and rise against imaginary pressure on crown of head; Moving up, sense whether one leg has more weight than the other (may cause subtle strain at the hips)
- Self-traction: Feel pull at base of skull and sacrum elongating spine. Practice self-traction: standing with pelvis slightly rotated and head suspended. Feel the spine lengthen. This may help with back problems
- Screwing in/Locking the knees: Concentrate on the knees. Feel as though they are simultaneously being pushed in and out. Then push the knees slightly outward. Feel a spiraling effect from the knees to the ground as if your legs were screws being screwed down into the earth.
- Find center: From the ankles, tilt the body forward, shifting weight to the balls of the feet, then back, shifting weight to the heel, then center; gently press thighs backward and sacrum forward to center.
- Relax in posture: relax the knees and lower back to let the tailbone “drop” rather than deliberately tucking in; feel the buttocks and feet relax as well. To “root” is to surrender yourself to the pull of gravity while maintaining a structural skeletal alignment which supports the body in an upright posture.
- Sink the Dan Tian: relax the abdomen and allow a heavy feeling, a sinking feeling, to drop the body through the supporting foot and into the ground. With each exhalation, feel the abdomen relax and sink down even more
- Connect head to feet: extend the spine by holding the head suspended until you feel it in the feet
Standing Post, Fourth Position: Eye level
- This position is optional in beginning practice. It helps to increase strength, endurance, stability in the shoulder girdle.
- From the previous position, raise the hands up to eye level and turn the palms out. The forearms should form an inverted v-shape. Imagine the palms and forearms resting near the top of a large sphere in front of the body. The palms should be face obliquely toward the opposite corners of the room. Keep the shoulders and elbows relaxed and hanging down.
|
|
Standing Post, Fifth Position
- Slowly lower the hands down to waist level.
- Palms down, arms held slightly away from the body. Elbows and shoulders relaxed.
- Imagine the palms as if resting on two balloons floating on the surface of a stream. Use just enough pressure to prevent the balloons from floating downstream. Imagine the legs sinking down into the stream bed as you stand facing the oncoming current.
|
|
Standing Post, Sixth Position
- Place the backs of the hands over the lower back
- Slowly shift the weight forward onto the balls of the feet, then back toward the heels. Feel as if you were massaging the bottoms of your feet with the ground as your roll the weight back and forth. Now shift the weight from side to side, swaying the body like a tree, and allowing the weight of the body to give the feet a deep tissue massage against the ground. Finally circle the weight from the front of the feet to the side, the heel, the other side and back to the front. Do this several times, describing a circle in the air with the crown of the head. Then repeat in the other direction.
- Lower the arms down to the sides, straighten the legs and rest for a moment with the eyes closed. Notice how the body feels. Notice any feelings of tingling, numbness, pain or any other sensations in the body.
- This is a variation on the previous ground connection exercise. This time, we add the element of shifting the weight from foot the foot.
- First do the previous exercise for a few cycles. After you’ve compressed down and bent the knees, shift all of your weight onto the left foot. The right leg should be completely “empty” and free to float in the air, or keep the toe on the ground for balance. Feel the pressure build up through the left leg to the crown.
- Then slowly, against resistance, push yourself back up to standing position. Shift back and forth from left to right several times. Do not allow yourself to “float” up. Keep a constant sense of pressure at the crown of the head.
- In the beginning, just slight bending of the weighted knee is fine. The bent knee should not go past the toes. The leg, knee, and hip areas should comfortably transmit the ground strength to the body: feel as if you are balancing a bean-bag on your head and be aware of the path from the weighted leg, through the hip joint, up the sacrum and spine to the top of the head. Maintain the beanbag with this constant ground connection.
- Exhale as you go down.
- Inhale as you rise
- You can also use either a chair or hanging rope as a stabilizing aid.
- Stop. Imagine yourself doing the movement. Feel muscles contract isometrically as if they were just beginning the movement or as if something were blocking the movement, resisting it, but don’t actually move.
- Now perform the movement again.
- Return to center and rest for a moment. Feel how much more rooted and settled the whole body feels.
Ground Connection Through the Hands
In the previous exercises, it was relatively easy (with a bit of practice) to feel a vertical ground connection between the ground and the crown of the head. However, outside of soccer practice, one rarely strikes an object with the crown of the head. More often, force is applied through the hands and feet. This poses difficulties since most people hold a lot of tension in their neck and shoulders. It will be necessary to gradual release that tension before you can effectively transmit force from the ground. The following exercise helps to feel a connection from the hand through the arm, shoulder, spine, hip, leg and foot into the ground.
- Stand facing a wall with the toes only an inch from the wall.
- Raise both palms and put them on the wall in front of the chest as if to push it
- Push against the wall and feel the ground connection from the hands down to the feet
- Now move away from the wall, put one foot toward and the other back. Try to push the wall again and notice the much stronger ground connection. Relax around this ground path. Feel how little muscle exertion is necessary to maintain it.
- Lift the front foot off the ground and feel the line of force from the hands into the rear foot.
- Lift a hand off the wall. With only one hand on the wall, rotate the body along the axis of the ground path
- Keep the shoulder pushed forward (serratus anterior abducting scapula) to connect shoulder blade to the back
- Keep your lower back relaxed
- Feel and build a curved path from where they are pushing your arm, through your back, and down your rear leg
- Try to relax around this ground path as much as possible; the knees and waist should be able to wiggle easily while you are still feeling the ground-path
- In Tai Chi, movement originates from the ground, is manipulated by the powerful torso, and is expressed through the hand. Almost zero force is used. The mind directs the ground force, the extended connection, the weight of the hand, the exhalation of qi through the hand. To train with force is a mistake which only leads to “li” – external, muscular force.
- The head suspended from the crown sets up a mild tension/traction along the entire spine which helps unite the body and gives you a “grip” with which to manipulate the force
- When you do the opening of Tai Chi, you connect your body fully with “earth strength” and the very tenuous “whole-body connection.” Movement should be driven by ground connection and the ribbon of ground strength should never be broken. If you maintain the ribbon of ground strength constantly, manipulating real or imagined things with ground strength, your movements can only become correct. One leg is a “feed” for the ground strength until the feed naturally changes to the other foot. In the classics, the leg with the ground force feed is called “substantial.”
- The important thing in all forms is learning to manipulate the ground force with such facility that it becomes part of your movements in all direction
Connecting the Hand to the Spine
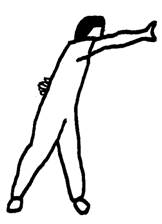
This exercise helps to strengthen the sensation of having all of your arm movements coming from the spine, which is a basic principle of Tai Chi. The arms should never move independently; they should always be carried by the movement of the spine, just as the spokes of a wheel are carried by the rotation of the axle.
- Stand with the feet shoulder-width apart, crown of the head as if pulled up, knees slightly bent, pelvis gently tucked under.
- Raise the right arm across the front of the torso with the palm facing away from you at a 45 degree angle, toward the left corner of the room.
- Place the back of the left hand over the curve of the lower back. Keep the hips facing forward. Push the palm toward the left corner, taking up all the slack in the arm until you feel a slight stretch from the palm down the arm, through the shoulder blade and into the spine.
- Now, if you wanted to push the arm any further, you would have to twist from the hips, rotating the trunk so that the right side of the pelvis thrusts forward. Do this four times, being sure to keep all of the slack taken up in the arm so that all of the thrust comes from the lower back and not the arm. There should be no flexion or extension of the arm; it is being carried back and forth by the rotation of the trunk.
- Do this 4 times on one side then the other, alternating back and forth several times.
Stationary Drills from the Tai Chi Form
(N.B. these drills refer to isolated postures from the Tai Chi form which are described in greater detail later in this book)
Cloud hands
Perform the Cloud Hands movement from the Tai Chi form several times while standing in place, without moving footwork. See the description of this movement later in this book.
Grasp Sparrow’s Tail
Perform the peng/lü/ji/an (ward off/deflect/press/push) from the Tai Chi form. Do this several times while standing in place with rooted feet. Alternately, just do peng and lü (ward off/deflect) repeatedly. See the description of this movement later in this book.
Playing Pipa
Holding the Playing Pipa stance from the Tai Chi form helps to build strength in the legs. Begin with just 30 seconds and work up to several minutes. Keep the front foot relaxed and do not bear any weight on it. See the description of this movement later in this book.
|
|

